The Desert Perpetual
Maps


Video Guides
Guide Notes
Opening
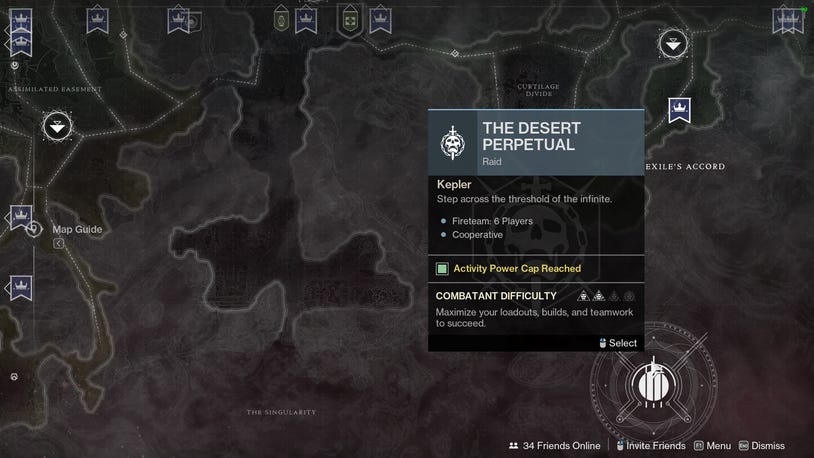
You can't just wander into The Desert Perpetual right off the bat; you have some things to do before you can enter. Here's a short list:
- Ownership of The Edge of Fate
- Completion of The Edge of Fate Campaign
- Reached Activity Cap of 100.
You'll be able to find The Desert Perpetual raid in the bottom right of the Kepler destination map. Simply access this map through the new Portal screen, and you'll be good to launch from there.
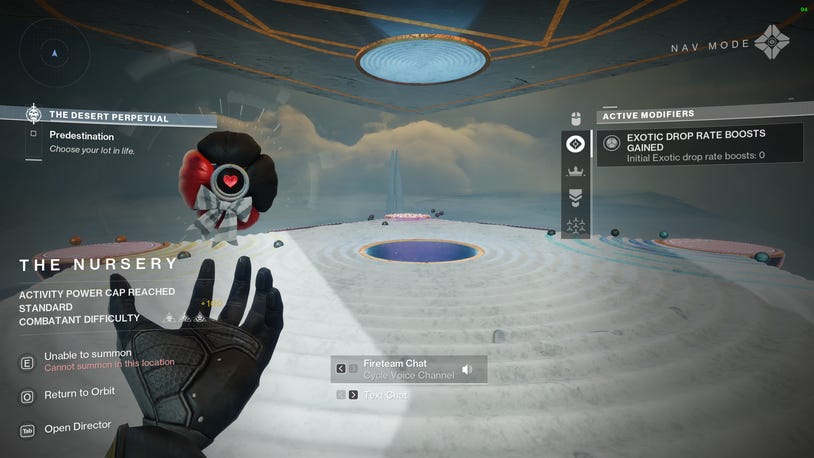
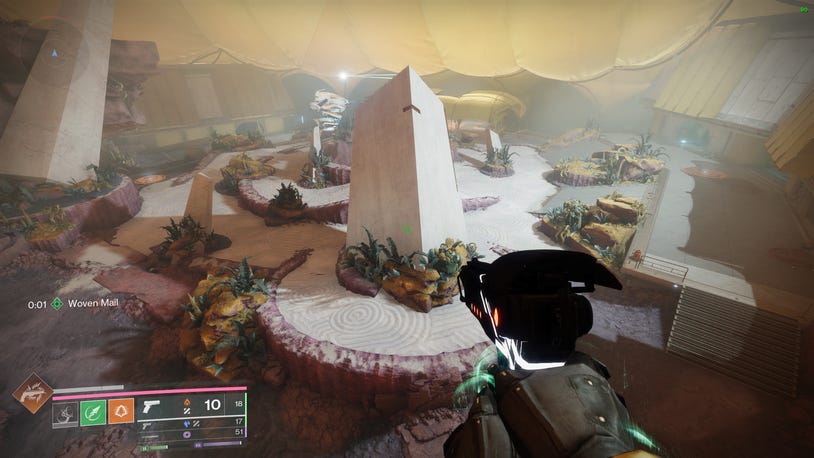
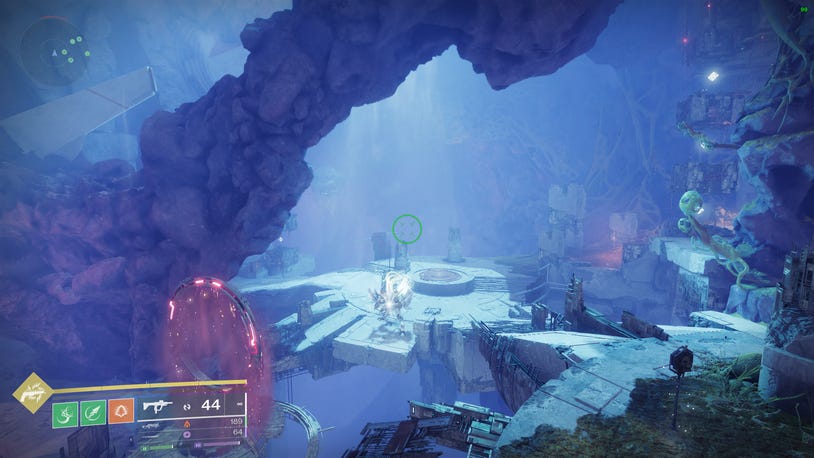
The Desert Perpetual Opening Hub
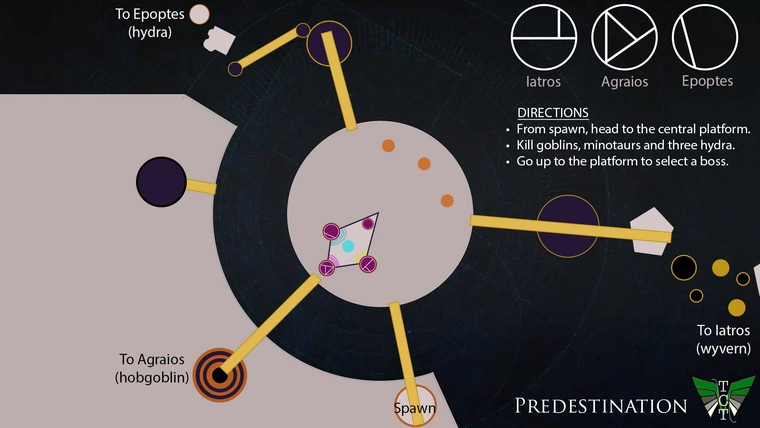
The Desert Perpetual is a unique raid in that there is a central area that you always return to. It is also unique as it allows you to choose the order of your encounters, picking what boss you'd like to fight first.
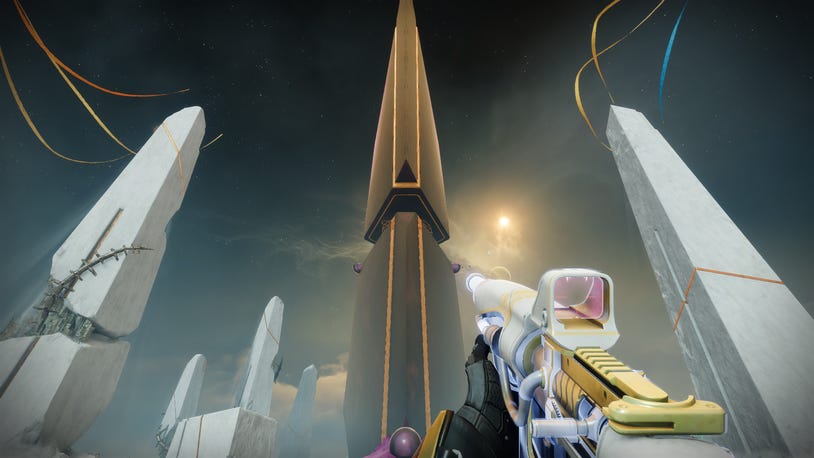
As you can see in the image above, the Predestination objective is present, saying '<meta />Choose your lot in life'<meta />. A bit of a cryptic way of telling you that you can now ascend the spire in the other image using the lift at the back of it. Simply walk up to one of the three pink platforms with the swirling orbs around them and choose your boss. The interactables are also a bit uninformative as to what you'll be facing, so here is a quick table showing which boss you'll fight in relation to each interactable.
Once you choose a boss, you'll be locked into fighting that one, so begin making your way to the boss arena. As this raid doesn't have a predefined order, we'll break down each boss in the order they are in on the table above.
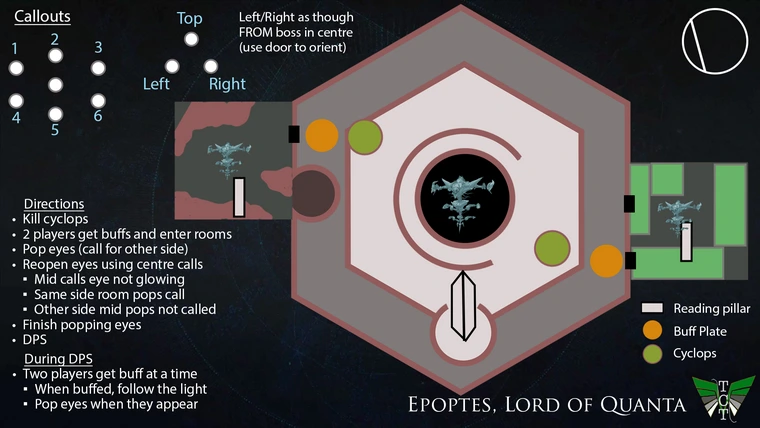
Epoptes, Lord of Quanta (Hydra - “All are entangled”)
Epoptes, Lord of Quanta, is a classic 'reading and shooting' boss, essentially just an encounter where one person calls something out, and the other shoots the corresponding 'thing'. Here are a few quick tips on your loadouts and team composition.
- Make sure you have at least one Well of Radiance Warlock
- 5 Thunderlord and 1 Tractor Cannon (Tractor Cannon player can use Special weapons for damage). Alternatively, Outbreak Perfected works well.
- Damage supers (Celestial Nighthawk Golden Gun, Star-Eater Solipsism Nova Bomb, and Cuirass of the Falling Star Thundercrash)
- An Arc Titan running Storm's Keep for Bolt Charge generation
Roles And Start
While none of the above are necessarily mandatory to complete this boss, they'll all make your time much easier and give you a comfortable 2-phase on this boss.
As you see above, there are two sides to this encounter, so you're going to want to split your team into two groups of 3. You'll also want to assign an "inside" and "outside" reader for both sides, but we'll break down their roles later.
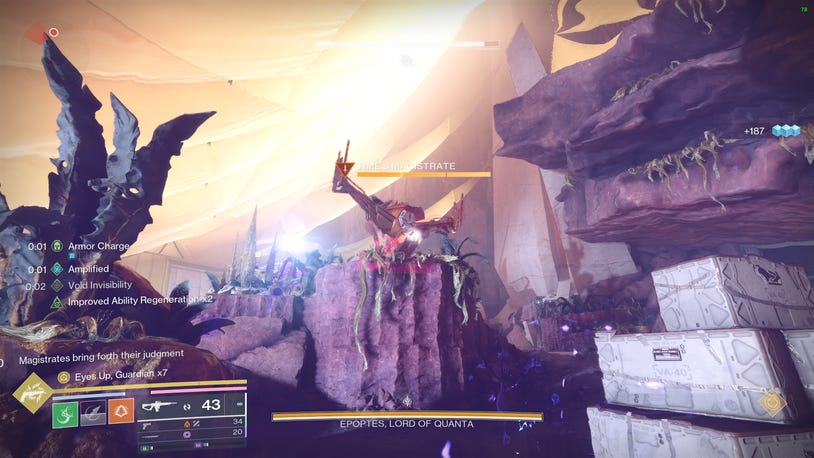
Once you kill the initial group of enemies, a message in chat will appear saying '<meta />Magistrates bring forth their judgment'. This is to signal that the 'Time's Magistrate' cyclopses have spawned. One spawns on each side, and it blocks you from getting the buffs necessary to progress the encounter.
Temporality And Inside Players
The buffs in question are 'Temporality' buffs. In this encounter, you'll find two kinds of Temporality: Cyclical and Constant. While the difference between the two doesn't matter here, the fact that they are different at all does, as they allow you to shoot different things to progress the fight. Once you defeat both cyclopses, the plates will unlock, as shown by a white conflux-like visual hovering over them. Standing on your plate will prime it, but you need another player to stand on the other plate to receive your Temporality buff.
Note: Temporality buffs have a timer attached to them, and if this timer hits zero, you will die. Each encounter has a way to refresh/remove this buff from yourself via encounter progression.
Have both of your 'inside' readers step on the plate to receive their buffs, and head inside the rooms found on your side. The plates are right in front of the doors, so you can't miss the entrance.
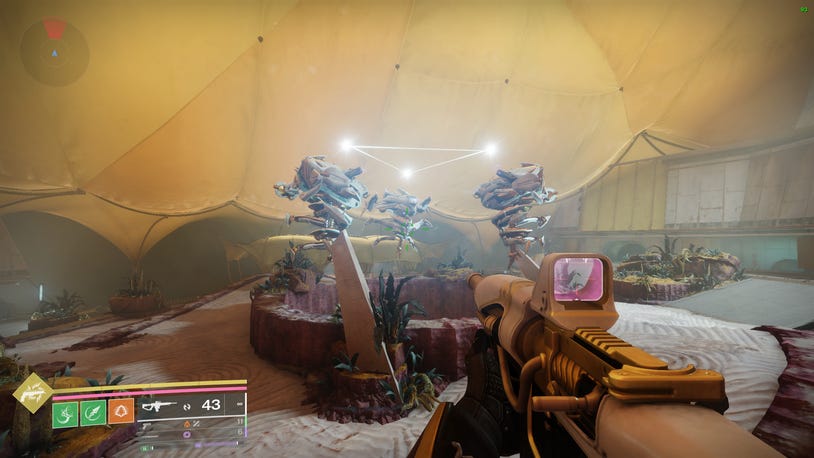
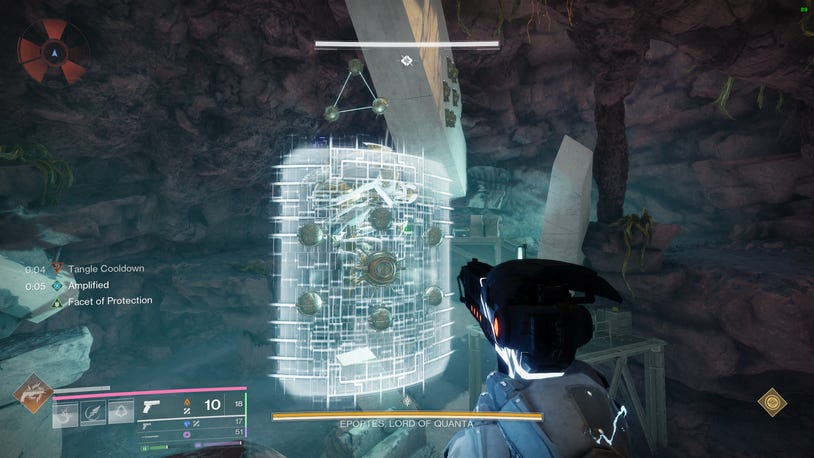
Once inside, you'll notice that the Hydra's shield has a couple of 'lenses' on it. These all have to be destroyed for your team to make it to damage, but you'll need to destroy them in the correct order. To know this order, you need the other side's inside room player to communicate which of their diamonds is glowing. You may also spot the triangle of spheres above the Hydra. This is important, but it is tied to the outside readers, so we'll come back to that soon.
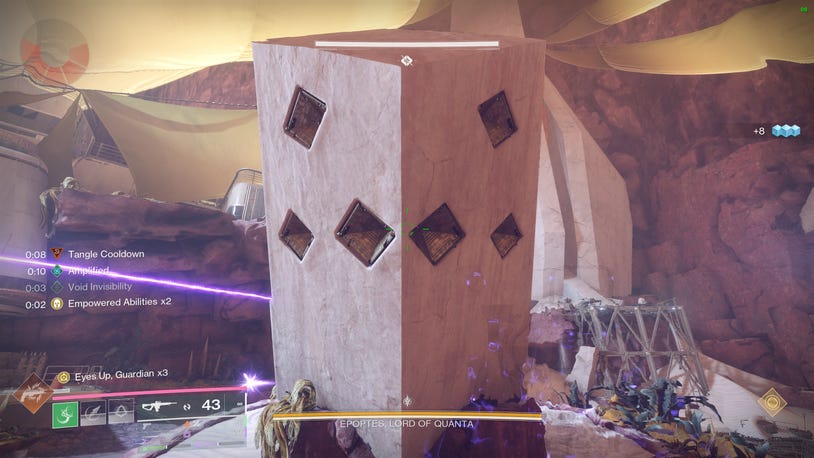
As you can see above, the diamonds on this structure match the layout of the lenses on the other side's hydra shield (this rule applies to both sides). With Temporality, one of these will glow, and you must call out which one is glowing so the other player can shoot it. Once you do this, you'll receive a call back from the other inside player reading their diamonds, and you too will shoot the corresponding lens on your hydra shield. This is essentially a ping-pong of callouts. We suggest using numbers to make this process efficient, proceeding from 1 to 6, reading like a book, so that the top left is 1 and the bottom right is 6. However, choose any method that works for you!
Note: You must be standing in the Hydra shield's light beam to destroy the lenses. It is recommended you stand in this beam regardless though as it halts the timer on your Temporality buff, preventing you from dying.
Outside Readers And The Triangle
After a period of reading, calling, and shooting from inside players, you will see a chat pop-up saying '<meta />Epoptes judges parameters exceeded and prompts function collapse'. This is a rather lengthy message, indicating that outside players must now get involved or the team will wipe.
If you are an outside player, you also now have to receive your side's Temporality buff. There is a chance that a Time's Magistrate has respawned, blocking the buff. If this is the case, destroy the Cyclopses as quickly as possible, due to the boss preparing its wipe attack. However, in most cases, you'll be able to get the buff before cyclopses spawn, and you'll destroy the cyclopses once your job as an outside player is done.
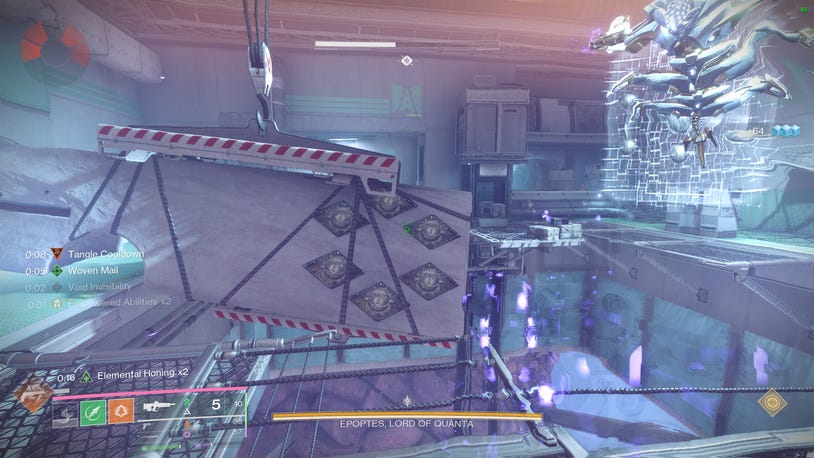
Once both readers have their buffs, they must stand in the beam of light coming from Epoptes's shield. Doing so will halt their Temporality buff timer and allow them to see 2/3 of the diamonds light up. The outside player must call out the one that is not lit up, and the inside player will then shoot the one that was called. You can use any callout system here, but top, left, and right probably work easiest.
Making a callout isn't the only thing you have to do as an outside player, though. On top of saying which of your side's diamonds aren't glowing, you must listen to the other outside reader's call and shoot the two diamonds that they do not call on their side. To put it simply, you need to shoot the other side's glowing diamonds, as doing so will destroy them. Once the outside and inside players have destroyed their diamonds/triangle sphere, all players will lose their Temporality buffs, and the wipe mechanic will be interrupted.
Once this phase is complete, inside players will grab their Temporality buffs again. As mentioned earlier, Time's Magistrates will likely be alive at this time, so destroy them to ensure your inside players can get their buffs. Inside players will head back inside and finish their lens-breaking and diamond reading. Once they have done this, they will receive a buff named 'Probabalistic Lancet' which allows them to destroy Epoptes's shields by destroying the central lens on Epoptes in the main room. Make sure to stand in the beam of light coming from one of the lenses, as this is 'your lens'.
Epoptes DPS
The DPS phase on Epoptes lasts quite some time, so prepare to be in this for the long haul. Three times during DPS, Epoptes will 'pull players through time'. This message (including your name) will appear in the chat box, telling you that you're next in line for the mechanic. This mechanic is the same as what the inside players had to do, just without the reading and calling.
Once you are 'pulled through time,' you receive a random Temporality buff, as well as the Probabalistic Lancet buff. You will have to run to the half of the Hydra's shield that you can destroy by standing in the beam of light and destroying the lenses that spawn. The lenses don't spawn immediately, so you have a bit of time, but don't be too long, as if you don't destroy the lenses in time, you will lose a phase of damage. The lens layout is the same as the image shown above, with six lenses circling a central lens, which will become vulnerable once the outer six have been destroyed.
Tip: Once both 'chosen' players are standing in their respective beams of light, the boss will become vulnerable again, allowing the other four members to continue damaging.
You only get three complete damage phases on this boss, so make sure you are dealing at least 33% HP per phase to clear. Once your team manages to drop Epoptes to 0 HP, you've beaten the encounter.
Iatros, Inward-Turned (Wyvern - “Axion is axiom”)
Iatros, Inward-Turned, is the only boss in The Desert Perpetual with a shorter damage phase, and is all about coordination and teamwork. While there are numerous viable strategies, here's what we recommend.
- Non-Precision Damage Supers (Thundercrash, Nova Bomb, or Silence and Squall/Shadowshot)
- A strong debuff (Shadowshot, Tractor Cannon, or Divinity)
- 1 Gjallarhorn and 5 Rocket Launchers, Lord of Wolves with Divinity, or Legend of Acrius
- At least one Well of Radiance
While none of these are explicitly needed, particularly our choice of DPS weapons, you can defeat this boss with options like Divinity+Thunderlord. We simply suggest the above, as they seem to find consistent and easy success.
Roles, Start, And Goal
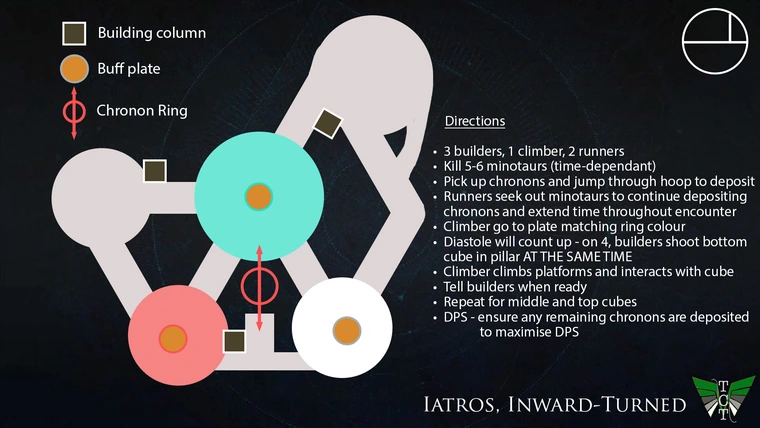
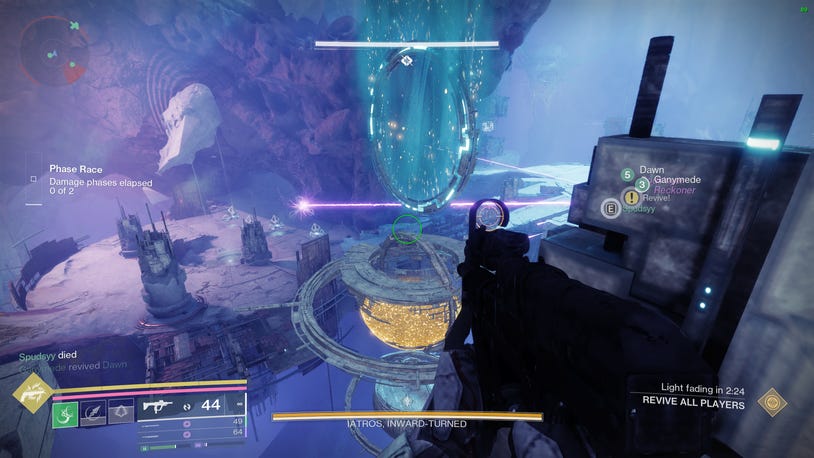
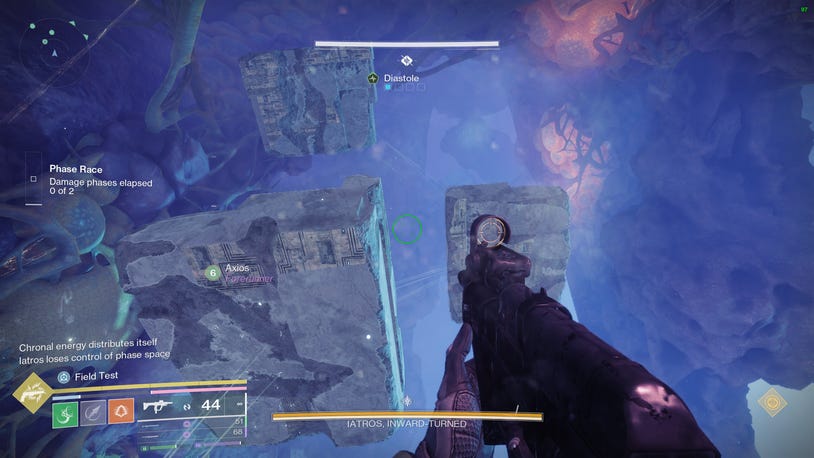
The general goal of this boss fight is to reach a 'node' on built platforms while ensuring that the hourglass (the structure under the blue ring) doesn't empty and cause a wipe. To do so, we suggest the following roles:
- 2 Climbers
- 3 Builders
- 1 Roamer
The climbers in this encounter will use the Temporality buff, which spawns from whichever plate is 'active' (we will cover this later). We also recommend two climbers rather than one. While only one person is technically enough, it can get quite hectic up there, so having a second person to help out clear enemies never hurts. The three builders are doing the central mechanic to progress the encounter, which we will explain later. Finally, the roamer is in charge of helping whichever builder needs the most help, particularly with the Time's Burden Minotaurs, and keeping on top of managing the hourglass in the middle.
At the start of the encounter, all your team has to do is collect six Chronons and deposit them through the big hoop in the middle of the arena. Depositing Chronons is simple; all you have to do is possess a Chronon by holding your interaction key near one and jumping through the hoop. To get Chronons, you must kill 'Time's Burden' Minotaurs. These Minotaurs spawn throughout the encounter, but six will spawn behind the boss at the start of the encounter. Kill these Minotaurs as fast as possible to get the ball rolling. Once your team has deposited all six, a Vex pyramid will spawn beneath the hourglass. Destroy this to 'truly' start the encounter.
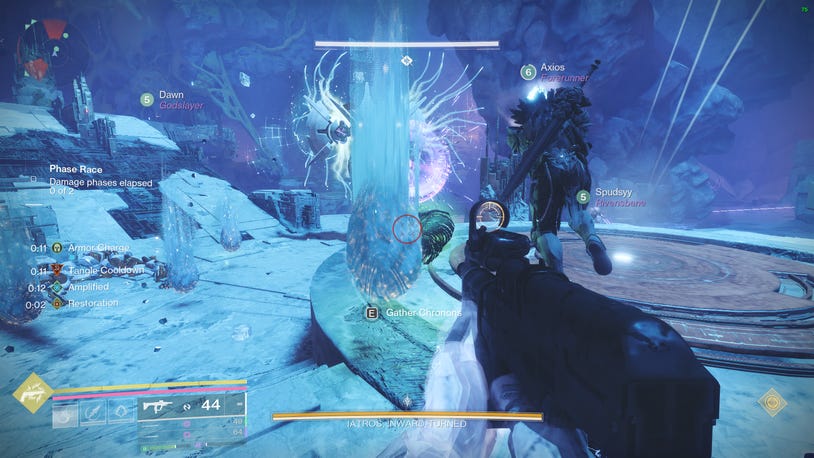
Building, Diastole, And Chronons
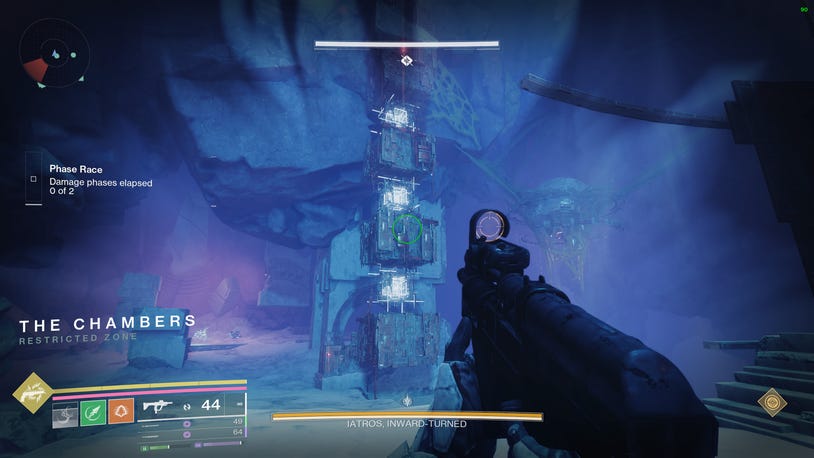
Scattered around the arena on the left, middle, and right-hand sides are these multi-stage pillars, with Vex cubes in the bottom, middle, and top segments, each corresponding to a 'level' of platforms you will build. You will also notice a buff named 'Diastole' beneath your health bar. This encounter is all about rhythm, and every fourth 'beat' of Diastole will launch your team into the air.
Tip: If you want to avoid being launched in the air, you can jump right before the fourth beat, and you will not be launched.
This 'Diastole' mechanic is very helpful for timing, as it is a built-in way for your team to sync up building pillars. Due to there being three pillars, three builders are required, and the mechanic here is that the same 'level' of Vex cube must be shot at the same time. If done correctly, a message in the chat box will appear stating '<meta />Iatros loses control of the phase space'. This will spawn a platform for the two climbers to jump on and progress upward. Make sure not to build new platforms too fast, though, as once you create a new set of platforms, the old ones will disappear. Listen to your climbers' calls and wait for them to say when you can build the next set of platforms.
This is all the builders have to do in terms of mechanics, aside from calling when Time's Burden Minotaurs spawn on their side to signal the roamer to come help destroy them to deposit Chronons. If you have spare time, make sure to help the roamer deposit some Chronons, as two Minotaurs spawn on each side.
Note: It is incredibly important NOT to mismatch your timing, as doing so will result in losing a significant number of Chronons from the hourglass, which will accelerate the wipe timer appearing. Not many Chronons are needed if the builders time their shots perfectly, but this encounter can quickly spiral out of control when panic sets in.
Should you ever lose all Chronons from the hourglass, not all is lost. A chat box popup will appear saying 'An empty hourglass heralds ill'. This is accompanied by the 'Neomutation' debuff timer beneath your health bar, which is essentially the wipe timer. If your team fails to deposit any more Chronons before this hits zero, you will wipe.
Climbing And DPS
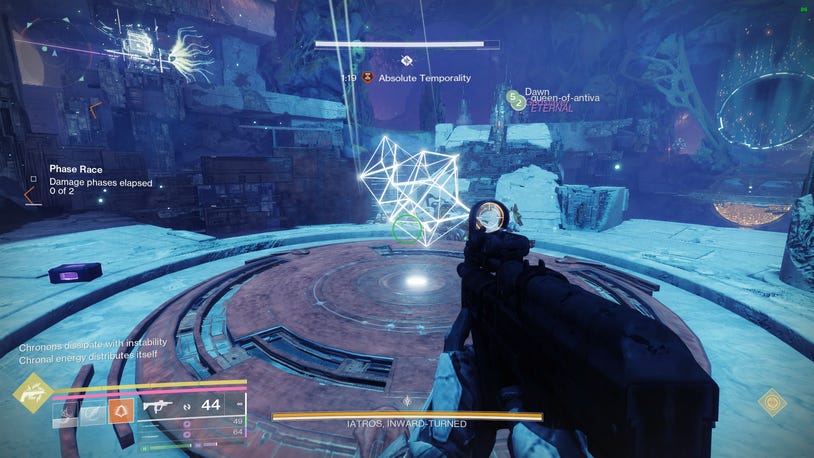
The climbers have quite an easy job for the most part. Once the Diastole and building mechanics have begun, you should head over to whichever Vex plate has been activated. These Vex plates can be found in three locations around the Chronon Hoop. Right in the middle of the arena, on the right near the rally flag, and down on the bottom left near the cave. The color of the hoop corresponds to which plate will activate, and the plates will activate once the Vex pyramid beneath the hourglass is destroyed. Here is a quick table:
As you can see, the hoop is blue, and the middle plate is activated. For reference, my two other teammates present in the above screenshot are near the 'spawn' plate; however, only the active plate is important here. Grab the Temporality buff by standing on the plate. This will give you 'Absolute Temporality'. Again, similar to Epoptes, the 'type' of Temporality doesn't matter here, only that you have the buff at all. Once the builders have shot their first cube and built the bottom level of platforms, you can begin your ascent.
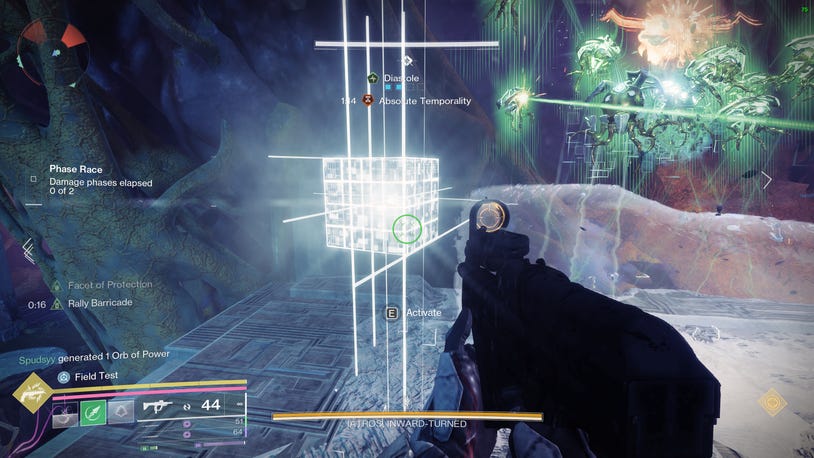
As you can see, there is a Vex node in front of me with the prompt' Activate'. This activation is necessary in order to progress the encounter, as it spawns the next node in the chain further up (with the final one beginning the damage phase), so make sure to activate all of them.
Note: Taking any damage will interrupt your activation process. The time to activate the node takes a couple of seconds rather than being near-instant, so make sure the Imp Swarms are being taken care of before trying to activate the node.
Once you have activated the node, call out to the builders that you're ready for the next set of platforms. Pay attention to the pop-up in chat 'Iatros loses control of the phase space' as this is your cue to jump to the next set of platforms, as the ones you were on before will quickly despawn. If you do fall, it's not a wipe, but you'll have to start the whole process again and have your builders begin building from the bottom Vex cube again.
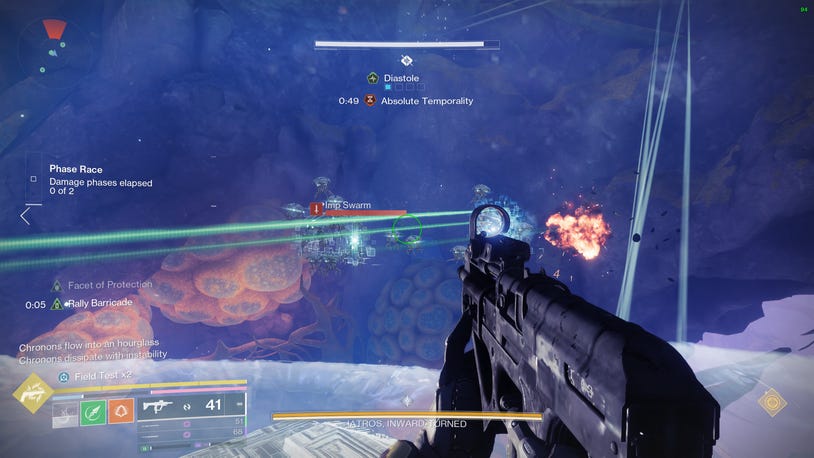
Once you have managed to ascend to the Vex node on the third set of platforms, you can activate to begin DPS. The damage phase will start shortly after the node is activated at whatever plate was active, and the boss will retreat as the DPS phase continues. If the damage phase begins at the left or right plate, the boss will walk towards the middle. However, if the phase starts in the middle, the boss will walk up the ramp to the spawn plate. You only get three damage phases on Iatros, so make every one count.
Note: If you have mismanaged your Chronons, your hourglass may empty, and the Neomutation wipe timer will begin. If you're lucky, there may be a Time's Burden Minotaur or Chronon nearby. If the timer is getting low, leave DPS and deposit your Chronon. It is also worth noting that once the damage phase ends, the Neomutation timer will go away on its own, regardless of how close you were to wiping.
Repeat this entire mechanics cycle one or two more times and reduce Iatros's health to zero to beat this boss and continue through The Desert Perpetual.
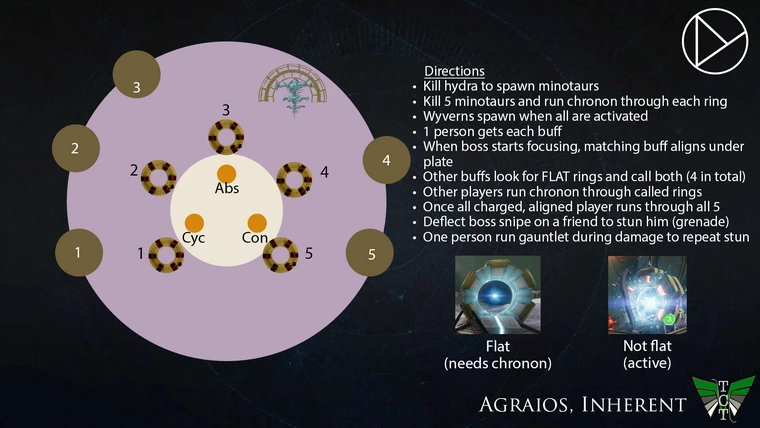
Agraios, Inherent (Hobgoblin -” Interference patterns swell”)
Agraios is a pretty straightforward boss when you get to grips with it, and has some pretty unique mechanics. Here is what we suggest you use to take down this boss:
- Damage supers (Golden Gun, Thundercrash, and Nova Bomb)
- Outbreak Perfected and one Tractor Cannon
This strategy relies on building as many supers as possible and dumping them on the boss as frequently as possible. While this isn't the only viable strategy, it is by far the easiest, so we suggest this DPS method. Additionally, we suggest numbering or naming the ring. We recommend going from 1 to 5 in a clockwise direction, starting from the leftmost ring.
Roles, Start, And Goal
The general goal of this encounter is to charge the rings in the center of the arena using Chronons within a set time limit. This is accomplished by 'turning' the rings on and then activating four out of five specific rings. This requires you to, once again, take down the Time's Burden Minotaurs present and the Temporality buffs, both of which will take a few dedicated players, so here are the two roles we suggest for this encounter:
- Three Temporality players
- Three Chronon runners
This setup is straightforward and is made quite obvious by the encounter due to its logical flow; however, it is still worth mentioning so you can dedicate certain players to do mechanics.
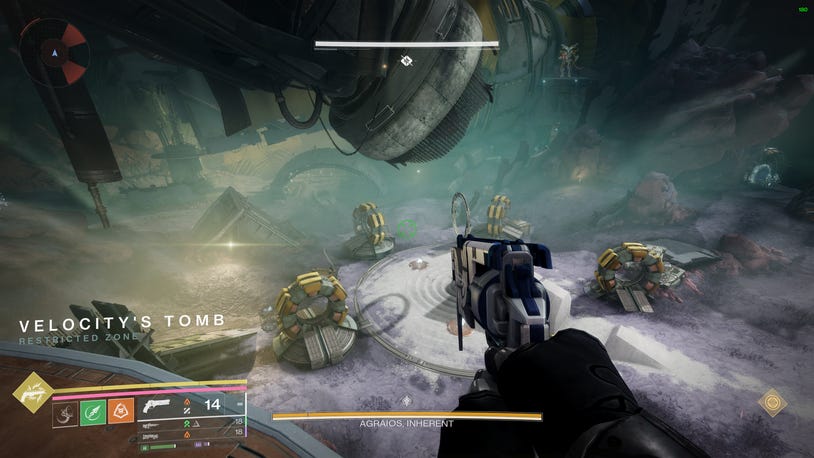
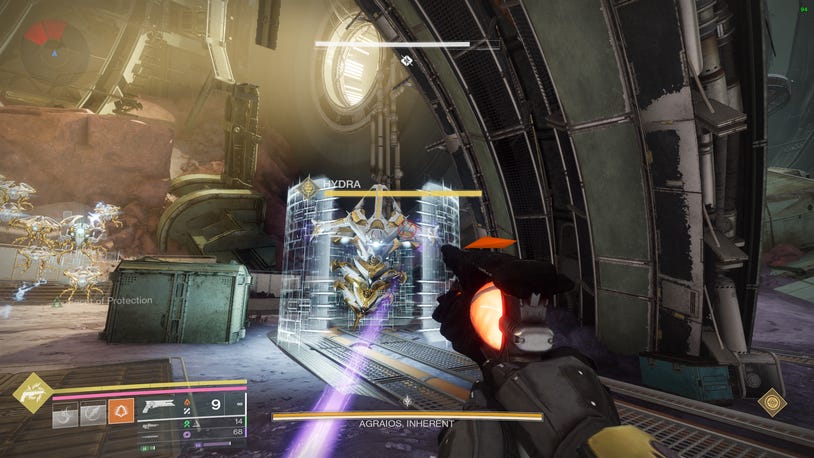
To start, your team will clear out the goblins that spawn until a Hydra spawns in the back right of the arena. Once you defeat this Hydra, Time's Burden Minotaurs will spawn. Everyone should look to defeat these enemies during this phase and pick up the Chronons they drop. Once you collect a Chronon, run through one of the five rings present. Once all five are active, destroy the Hydra that spawns in the back right again, and then the three Wyverns that are scattered around the map. Once this is done, have your Temporality players stand on their plates to receive their buffs.
Note: Defeating a Hydra spawns Time's Burden Minotaurs, so if you ever need more Chronons, try to kill the Hydra to have more spawn.
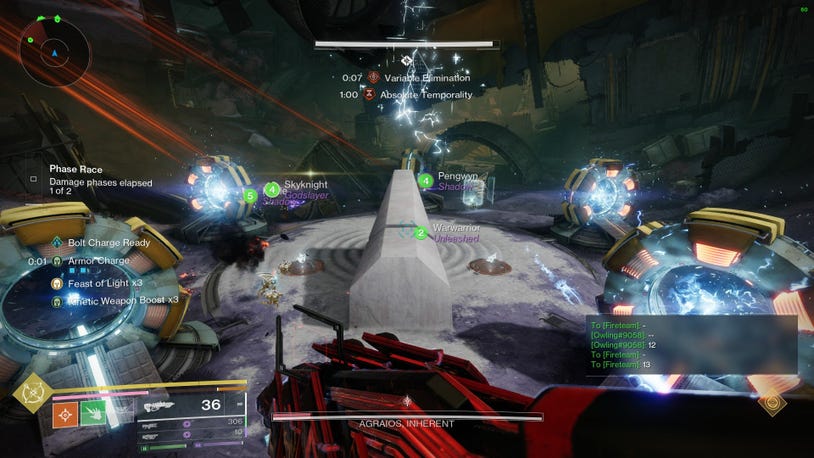
Chronons And Variable Elimination
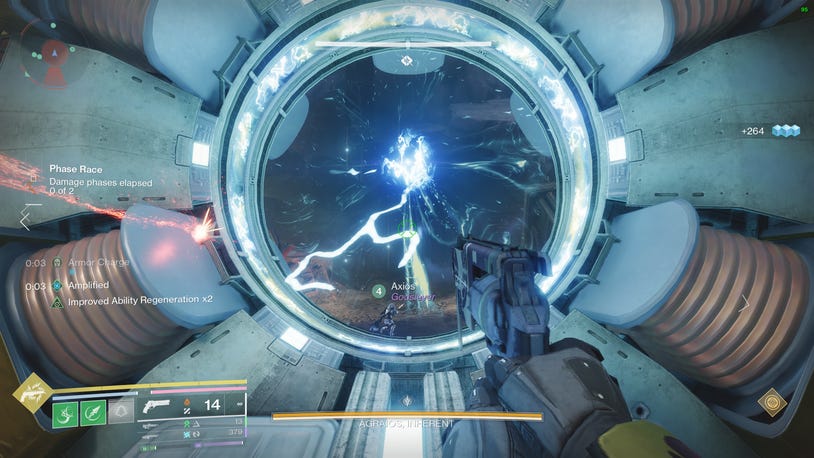
The above image is somewhat chaotic, but the important thing present is the Variable Elimination timer below the health bar. One of the bosses (either random or selected) will become 'active' and gain the 'Variable Elimination' attack. This essentially functions similarly to the Seraph Tower attacks in previous content, where if you stand in the boss's line of sight for 10 seconds, you will be one-shot. You cannot dodge or block this attack, however, you can reset the timer by losing line of sight of the active boss. You can tell which boss is active by their having a massive glowing red light on them, as you can see above.
While avoiding Variable Elimination, you and two others must gather Chronons and run through specific rings to deposit your Chronons. These will 'activate' the rings, progressing the encounter. The rings you run through are dictated by the Temporality team's calls.
Temporality And Pre-DPS
While the Chronon runners are gathering their Chronons, the Temporality players must call which rings to run through. This is very straightforward and can be explained by examining the image above. However, first, all three Temporality players must receive their buffs.
If your team is a bit slower, then Agraios will grow impatient, and one of the three copies of the boss will activate. If this happens, look at the boss's name. It will contain the word Cyclical, Absolute, or Constant. Whoever has that kind of Temporality needs to run under the boss and 'align' their Temporality to receive the 'Alignment Charge' buff. If your team is fast enough, you can choose which boss you want to align to, although this doesn't really matter.
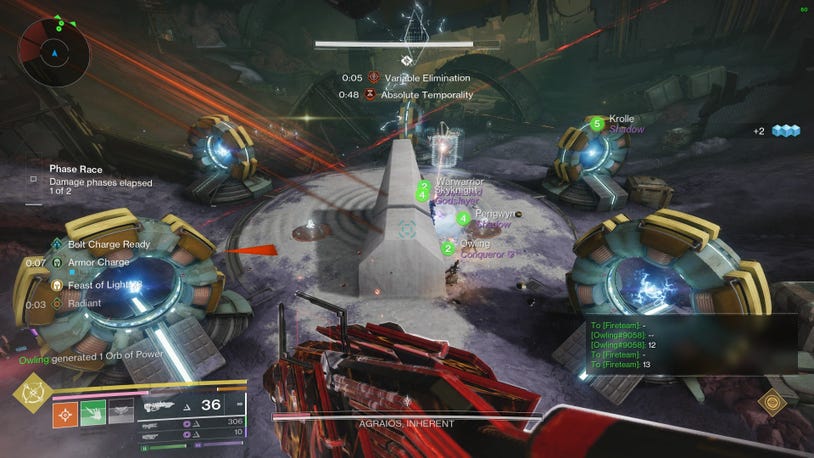
While one of the Temporality players aligns, the other two should examine the rings. As you can see in the image above, three out of 5 of the rings are glowing, with red/orange lights around them. You must call out the ones that are not glowing. Four rings in total need to be activated, and each Temporality player can see two.
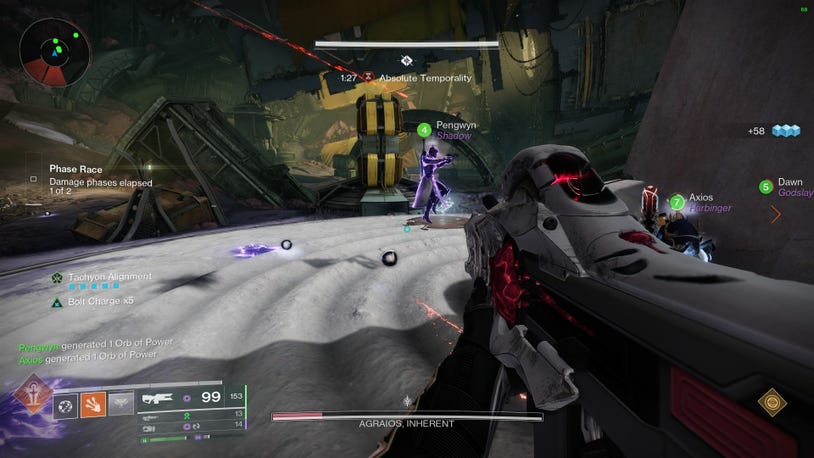
For comparison, look at the image above to see what it looks like when all rings are active compared to when some rings need to be called. All rings will stop glowing once the correct four have been activated, and the final phase before DPS will begin.
Once all four rings have been activated, the player who aligned must now activate their Alignment Charge buff. They will run through all five rings, and upon doing so, will receive a detain bubble as their grenade (yes a literal detain bubble). The grenade ability icon changes, as you can see in the image above, and upon casting this new ability, you will spawn a detain bubble around yourself. The objective here is to deflect the Variable Elimination shot back at the active boss, and doing so will begin DPS once the boss teleports down.
Tip: Summon the detain bubble by activating your grenade ability. Use it at around one or two seconds remaining on an ally's Variable Elimination debuff to deflect the shot. This will take some coordination!
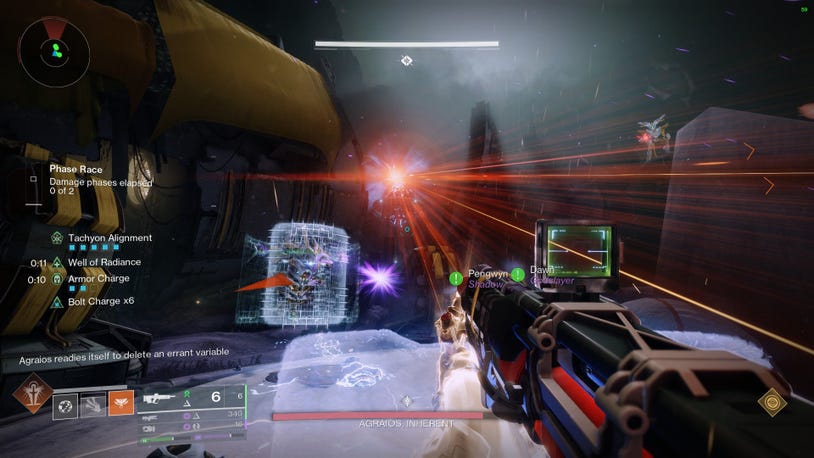
Damage Phase
During damage, the boss will attempt to teleport away a couple of times, and to bring Agraios back down, you need to deflect more Variable Elimination shots. While your team is dealing damage, the Alignment Charge buff will return to your entire team.
Tip: When Agraios teleports away, you can still deal damage. Sniper Rifles or continuing with Outbreak Perfected to keep the damage going is recommended.
Pay attention to the left side of your screen (where your character buffs are) to see when this appears. Once it does, have your designated runner (who doesn't have to be the one who was aligned before) run through all five rings and return to your team in time to deflect the shot. If done successfully, the boss will briefly go immune and teleport back down to the middle, and the damage phase will continue.
You can deflect two shots during damage so that you can get three 'mini' damage phases in one. Try your best to get at least one additional mini phase, as while this boss on normal mode isn't too tanky, you still have to three-phase the boss. Once you manage to reduce Agraios's health to zero, you have beaten this encounter.
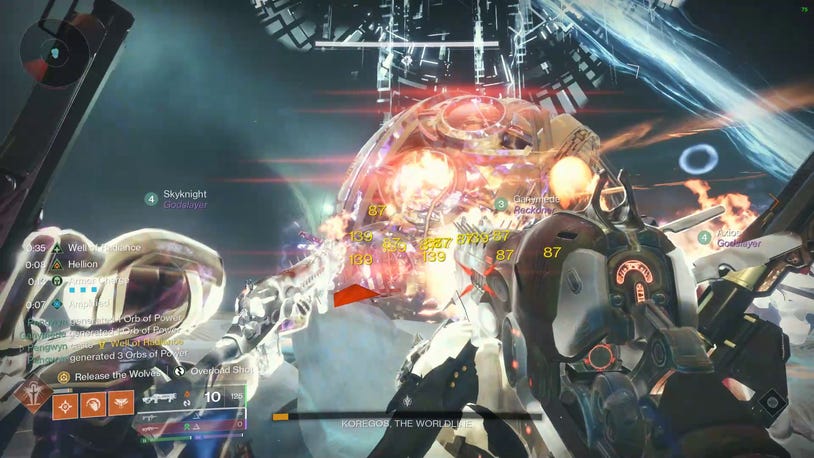
Koregos, The Worldline (Harpy - “Final Encounter”)
Koregos is a true final Raid boss, bringing together all the mechanics you have seen throughout The Desert Perpetual so far. All Temporalities, Chronons, and Alignments are featured in this encounter in one way or another meaning there's quite a lot to break down. However, first, we'll suggest what you should go into this encounter with:
- Five Outbreak Perfected and one Tractor Cannon
- At least three players with a suitable long-distance weapon (ideally a Sniper)
- Ideally two players using a weapon with obvious firing (for example a Trace Rifle)
These three bullet points aren't all exactly necessary, particularly bullet points two and three, but they will make your life easier, particularly for specific mechanics.
Roles, Start, And Goal
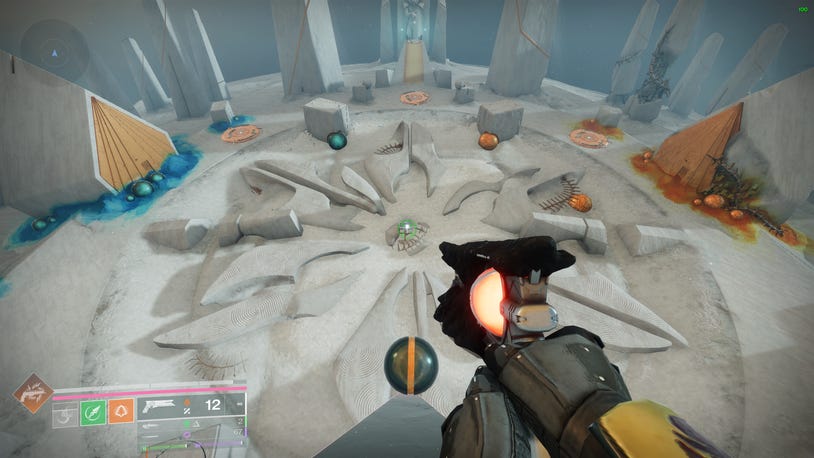
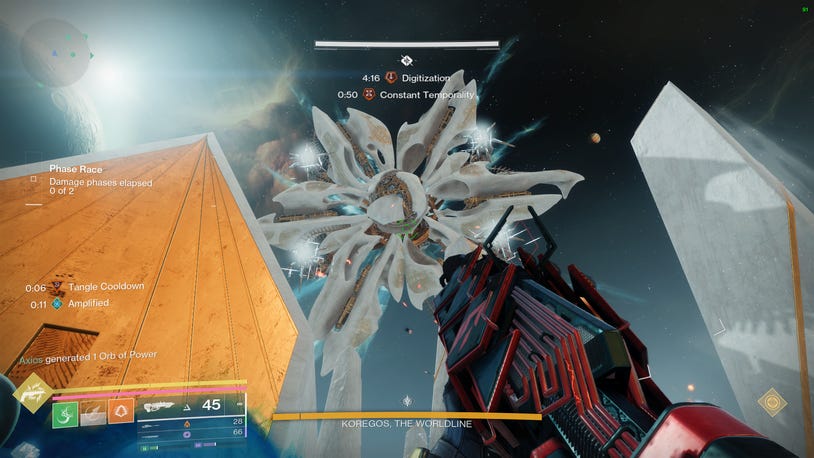
This fight starts pretty fast-paced, with Koregos not holding much back, unleashing the "Time's Arrow" beam attack immediately, vaporizing you almost immediately if you stand in the attack for too long. Alongside that, you'll have three Hydras to contend with, who are blocking the three Temporality plates found opposite the spawn. Defeat these Hydras as fast as possible to get the ball rolling.
Once these Hydras have been defeated, the Temporality plates will unlock. Here is how you will organise who gets what buff (while technically only three people need to get buffed, we suggest all six players receive a buff):
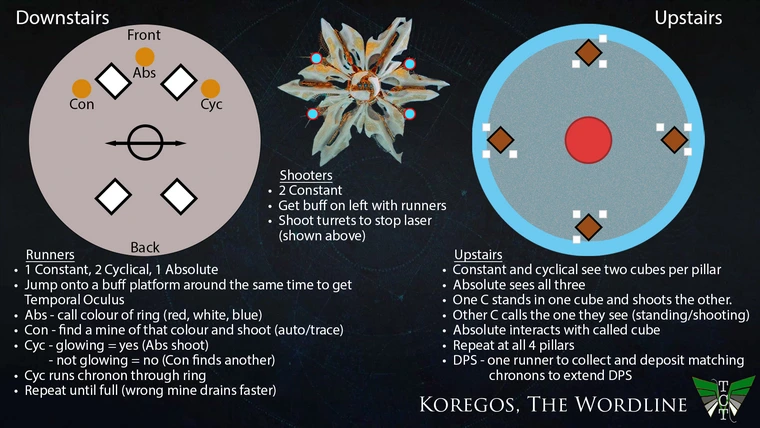
- Three players receive "Constant" Temporality (leftmost plate)
- Two players receive "Cyclical" Temporality (rightmost plate)
- One player receives "Absolute" Temporality (center plate)
As stated above, you can technically get away with having three unbuffed players, but unless you are running the raid with fewer players than intended, there is no reason to do this. Here is a small table giving a quick brief on what each Temporality can do in this fight:
On each Temporality team, you must assign one player to be the "Temporal Oculus" player as well. You receive this buff by jumping into a Vex pool found on the small podiums around the arena. This means that the Temporal Oculus team will be comprised of one of each Temporality type (including the sole Absolute player). These players are responsible for helping the Absolute Temporality player shoot the correct "mine" to spawn the correct type of Chronons. This does get quite confusing, so here is a list breaking down each 'team' in this encounter, as well as names we will use going forward:
- Only Constant Team (2 members) and Full Constant Team (3 members)
- Only Cyclical Team (1 member) and Full Cyclical Team (2 members)
- Absolute Team (1 member)
- Temporal Oculus Team (3 members, one from each Temporality)
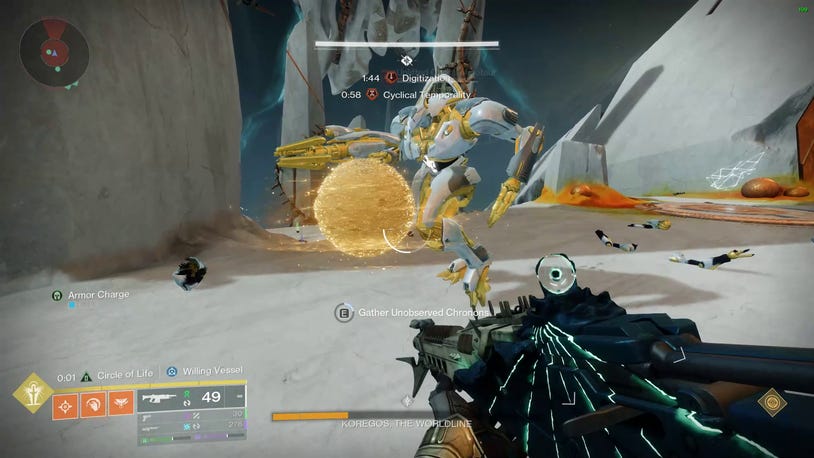
The overall goal of this fight is to stagger Koregos, interrupting its beam attack, spawning Temporal Oculus pools, which, in turn, allow the Temporal Oculus team to do their job in spawning Unobserved Chronons for the Cyclical Temporality team. The Cyclical team will then collect these Unobserved Chronons and deposit them together through the hoop, filling up the hourglass. Once six Chronons have been deposited, the next phase of mechanics will begin.
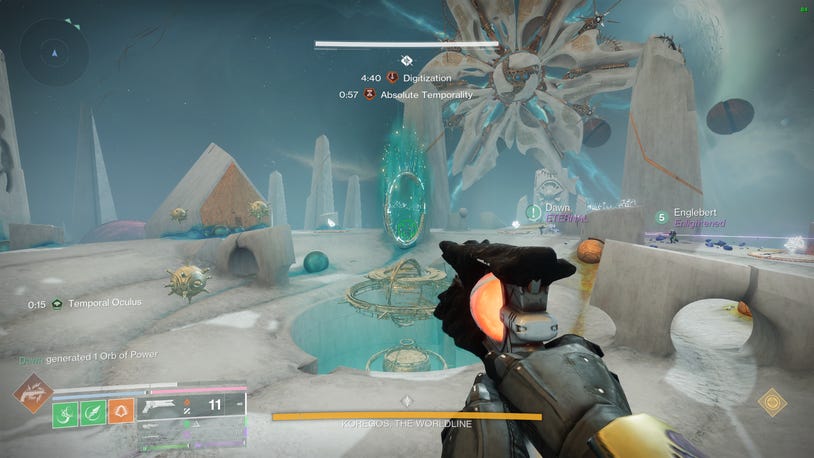
Constant Temporality
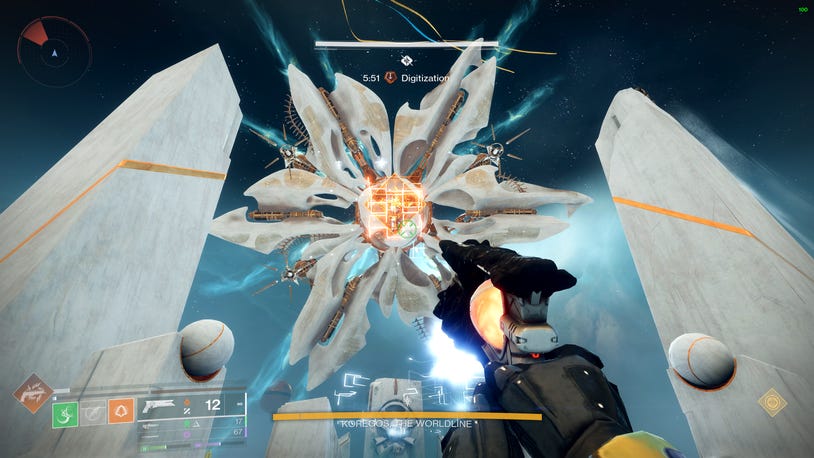
Constant Temporality is a very straightforward role. As you can see in the image above, Koregos is charging its beam attack, as evidenced by the big orange/red glow at its center. Constant Temporality players should call this out as a warning to their more "mechanic-focused" teammates.
In addition to calling out when the beam is prepped, Constant Temporality players must also deactivate the four 'cannons' on Koregos, located at each corner of its body and indicated by a glowing white light. Destroying these is the main job of the two "Only Constant Temporality" players, as the Temporal Oculus Constant player will be doing other mechanics.
Note: Stopping the beam isn't the only reason to destroy the cannons on Koregos, they also spawn the Temporal Oculus pools while resetting the timer on your Constant Temporality buff.
As you can see in the image above, I have the Temporal Oculus buff and the Constant Temporality buff. Having both of these allows me to see the color of the mines (blue in this case). This indicates that if this mine is online and destroyed, its Unobserved Chronons will become Cobalt Chronons, as these are the 'blue' Chronons. The same principle applies, as red mines will drop Cinnabar, and white mines will drop Antimony.
Tip: There are only nine mines in total, with three of each color. If you know the first one you find is inactive, then signal that the other two mines matching the hoop are correct for your Absolute player to then destroy as soon as possible.
The Temporal Oculus Constant player should listen to the Chronon Hoop call made by the Absolute Temporality player, and shoot at the mines matching that color to coordinate with the Cyclical Temporal Oculus player. This is best done using a Trace Rifle, as their firing patterns are very clear; however, Outbreak Perfected will work fine.
Cyclical Temporality
Cyclical Temporality players have two objectives: pick up Chronons, and then deposit them through the hoop. The Only Cyclical player has quite an easy job here, simply pay attention to the Temporal Oculus team's progress in spawning Chronons, and track the Unobserved Chronons down. These Unobserved Chronons are simply Chronons you cannot see the type of, meaning that when you jump through the hoop, it's a bit of a leap of faith, hoping that the Temporal Oculus team has done their job correctly. Upon doing so, the color of the Chronon Hoop will change.
Tip: There is a short grace period before the color of the hoop changes, allowing you to deposit both Chronons, but don't leave it too long. Depositing mismatched Chronons (e.g red chronons in a blue ring) will kill you instantly.
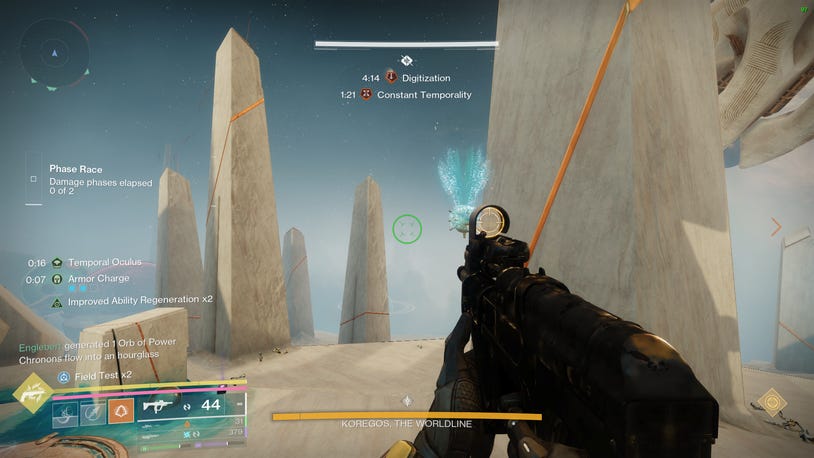
The Cyclical Temporal Oculus team member has a bit more to do. They must also receive the Temporal Oculus buff and aid the Absolute Temporality player in destroying the correct mine. Unlike the Constant Temporal Oculus player, the Cyclical player cannot see the color of the mines, but whether they are 'active'. This is indicated by the mine glowing bright or not glowing at all (as you can see in the image above, there are a few active mines in my field of view, and one inactive to the left of the hoop). Once the Constant Temporal Oculus player signals a mine, you must then call if it is active. Only then will the Absolute player know to destroy that mine. Once it is destroyed, you should then gather the newly spawned Unobserved Chronons.
Absolute Temporality
The Absolute Temporality player is solely focused on the Temporal Oculus team. Their job is to destroy specific mines that are verified by both the Constant and Cyclical Temporal Oculus players. Pay attention to the calls made by your other two Temporal Oculus team members, and call out to your Cyclical players where you destroyed the mine if they are struggling to find the Chronons.
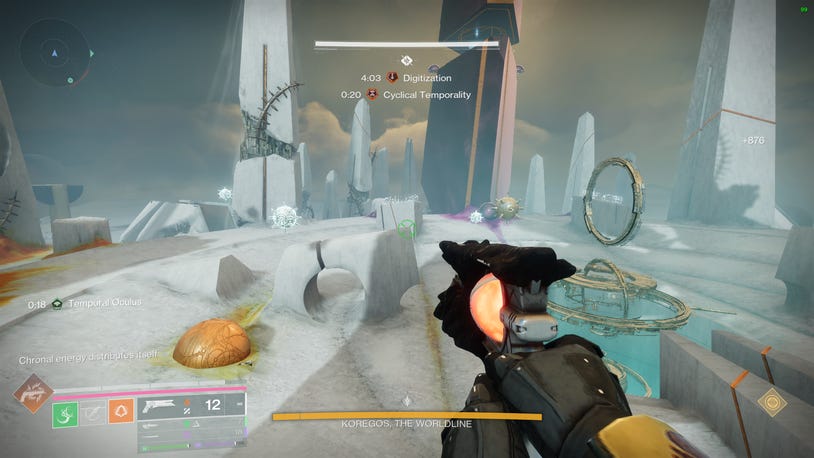
As you can see in the above image, the Absolute Temporality player can see the color of the Chronon Hoop. In this instance, it is blue. This means that you must call out that the hoop is blue to your two Temporal Oculus teammates, and have them coordinate to help you find the correct mines to destroy. Destroying correct mines will reset your Absolute Temporality buff timer.
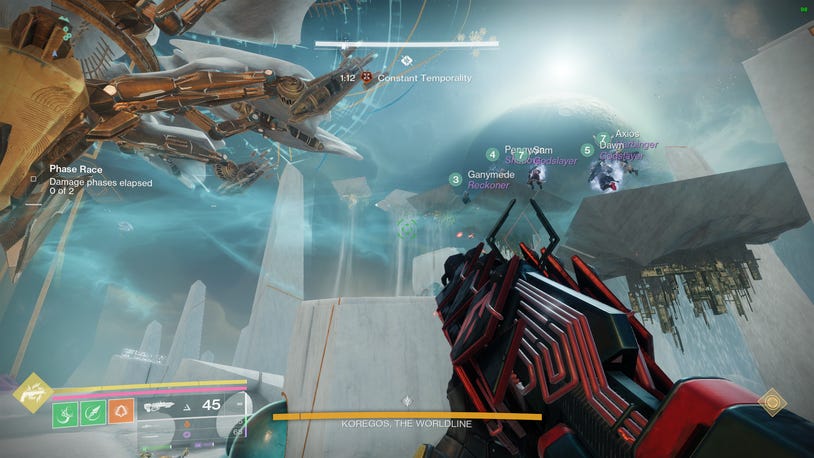
Pre-DPS And DPS
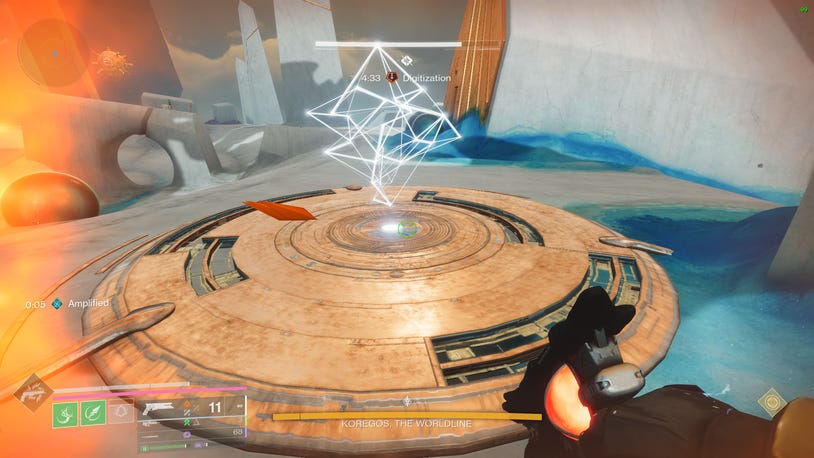
Once you have filled the hourglass with six Chronons, Koregos will soon spawn jumping platforms that your team must climb to ascend to the DPS arena. This is quite an easy little jumping puzzle that shouldn't cause you any hassle. However, once you reach the top, there is another final mechanic before DPS, as well as a couple of Imp Swarms to handle.
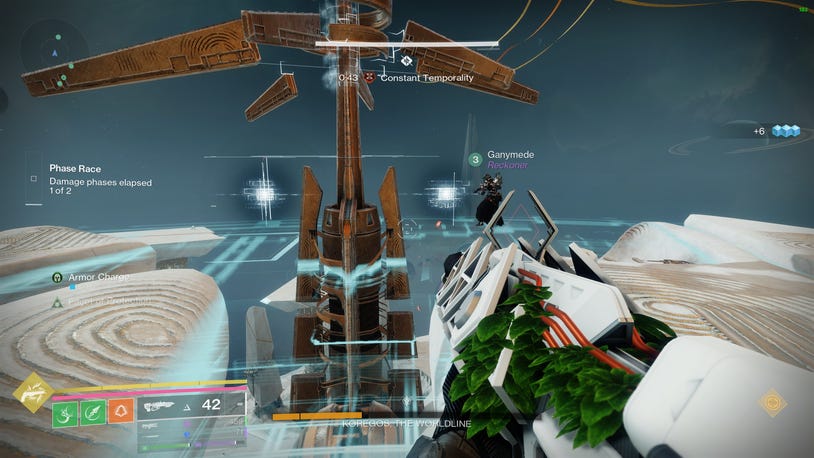
Once you have reached the top, you will notice some small Vex cubes around some brown pylons. This mechanic requires one of each Temporality to be involved, so we suggest having the Temporal Oculus team do this to keep things simple.
The Vex cubes in the above image can spawn in three 'broad' locations around the pylon: left, middle, and right. The exact location may differ slightly, but the general region is the same. The Absolute Temporality player will be able to see and interact with all three cubes, meanwhile the Constant and Cyclical players are only able to see 2/3. The goal here is to find the matching cube and have the Absolute Temporality player interact with that specific cube.
We suggest designating one person as a caller, and another one as a 'confirmer'. For example, the Constant player in the image above would call that the cubes are left and right. The cyclical player will then respond with one of those two sides, indicating which Vex cube the Absolute Temporality player must interact with. Once all pylons are complete, the boss will soon become vulnerable.
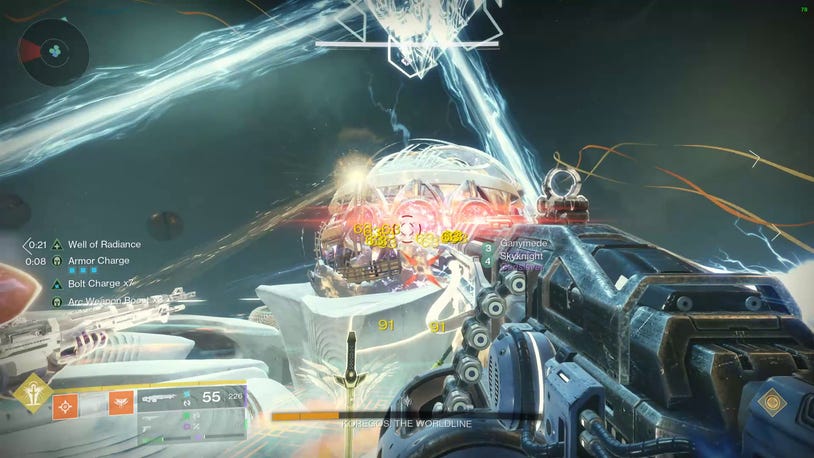
During DPS, there will be two beams that rotate, dealing quite a lot of damage. We suggest having a player keep track of these beams; however, this is not necessary, as with a Well of Radiance and some Arc Resistance mods, you can survive the entire beam without worrying about it.
On top of the beams, there is another mechanic to take note of, and that is the DPS extension mechanic. Throughout the DPS phase, Koregos will summon a Chronon Hoop, as well as one of each kind of Chronon. Your team must designate one player to consistently extend the DPS phase by gathering the correct kind of Chronon and depositing it through the hoop. We recommend the Tractor Cannon player do this to avoid a substantial DPS loss. There isn't a ton of time to get these extensions, so make sure whoever is doing this mechanic is on the ball.
Once you decrease the boss's health to around 10% HP, the boss will enter its final stand. Once you hit this threshold, the boss will briefly go immune and change the way it spins. Rather than going side to side, it will go up and down, so make sure you still try your best to hit the crits. This final stand does not last long, so give it everything you've got! Make sure you've saved some high-damage supers like Thundercrash, Golden Gun, and Nova Bomb.
Tip: Despite Koregos being in its final stand spinning animation, wait around a second or two before using your high-damage supers, or save them for the end. Koregos seems to gain a high amount of resistance right at the start of the final stand, or enters the animation just before the threshold is truly hit, rendering high damage abilities, such as Golden Gun, worthless, as there appears to be a damage cap at the final stand bar.
Once Koregos reaches zero health, don't celebrate so fast as the fight isn't quite done yet. Koregos will begin to fall apart, and it will bring you down with it if you don't get out of the way of the blast. You will notice the Decoherence Imminent debuff below your health bar. This is your sign to run away from the DPS arena as fast as you can until the debuff disappears. Only then will Koregos fall to the ground, and you will have beaten The Desert Perpetual.
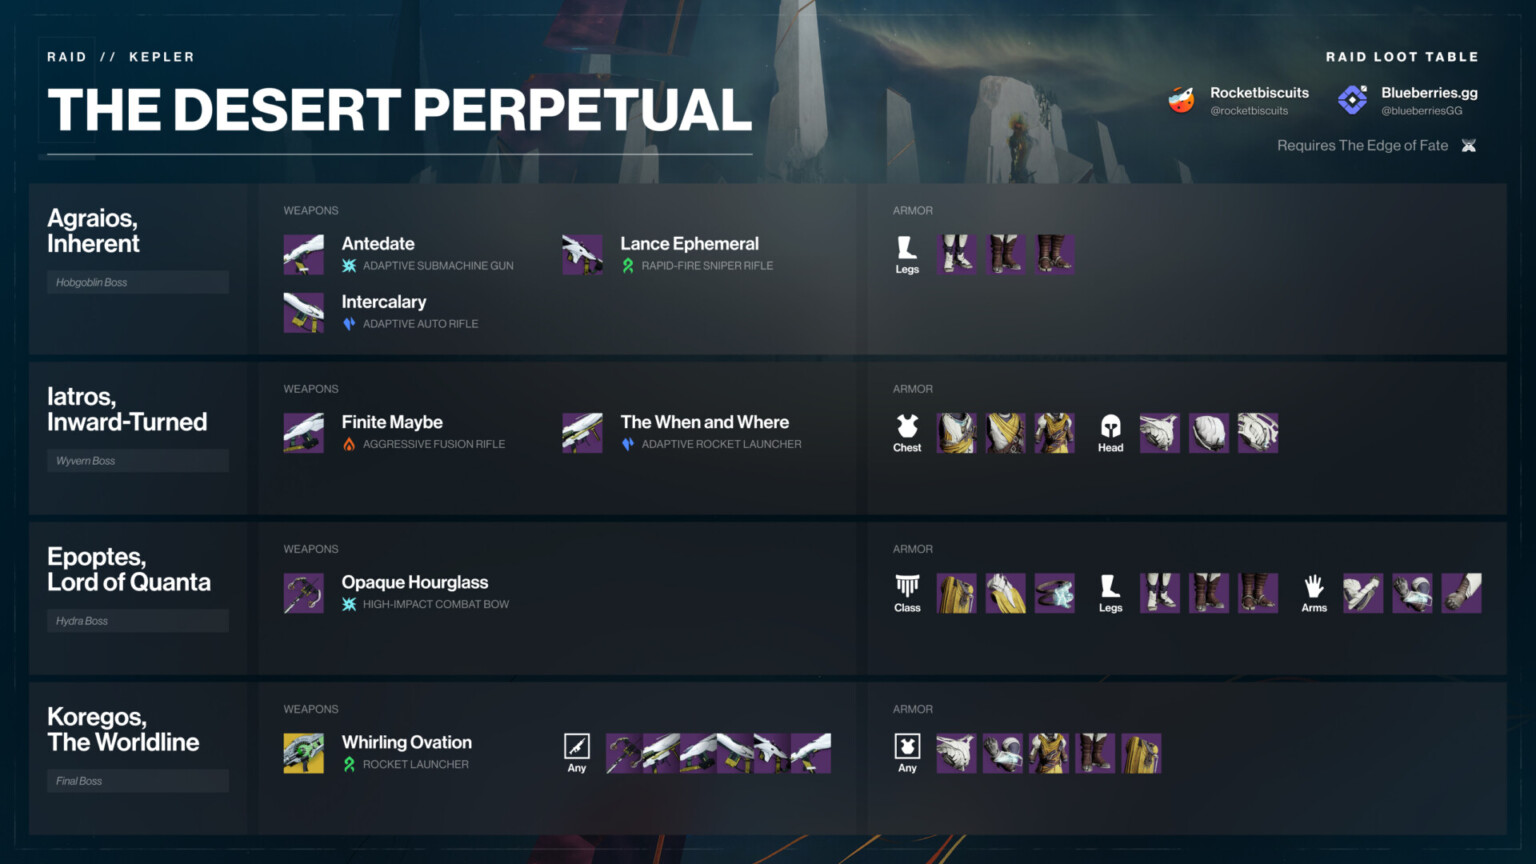
Upon clearing the raid, you can interact with the Raid Kiosk by the final chest to spend your Spoils of Conquest on The Desert Perpetual's weapons and armor. Do note, however, that you must have already earned pieces of gear to purchase them again at the kiosk.